A 17 HMR drop chart shows the exact flight path and gravitational drop of a .17 Hornady Magnum Rimfire bullet as it travels from the muzzle of the rifle to the target. Because the .17 HMR is renowned for its flat trajectory compared to other rimfire cartridges, understanding its ballistics is essential for accurate varmint hunting and target shooting. A reliable 17 HMR bullet drop chart reveals that actual bullet drop varies depending on specific ammunition specifications, muzzle velocity, the bullet’s ballistic coefficient, the height of your scope (sight height), and your chosen zero distance.
Table of Contents [Click to minimize]
17 HMR Drop Chart
The ballistic table below details the trajectory of the most popular .17 HMR load on the market.
Chart Specifications and Assumptions:
- Ammunition Load: Hornady 17 HMR 17 gr V-MAX (Item #83170)
- Bullet Weight: 17 Grains
- Bullet Type: Polymer Tip (V-MAX)
- Published Muzzle Velocity: 2,550 Feet Per Second (FPS)
- Ballistic Coefficient (G1): 0.125
- Zero Distance: 100 Yards
- Sight Height: 1.5 Inches (Standard rimfire scope ring height)
Note: The velocity and energy figures are based on Hornady’s published manufacturer specifications. The trajectory data represents standard ballistic calculations under normal atmospheric conditions at sea level.
| Distance (Yards) | Bullet Drop (Inches) | Velocity (FPS) | Energy (ft-lbs) | Trajectory Notes |
| Muzzle (0) | -1.5 | 2,550 | 245 | Bullet exits 1.5″ below the line of sight. |
| 50 | +0.1 | 2,196 | 182 | Bullet crosses just above the line of sight. |
| 100 | 0.0 | 1,874 | 132 | Zero Distance: Exact point of aim. |
| 150 | -2.6 | 1,584 | 95 | Noticeable drop begins; holdover required. |
| 200 | -8.5 | 1,331 | 67 | Significant drop; wind drift becomes a major factor. |
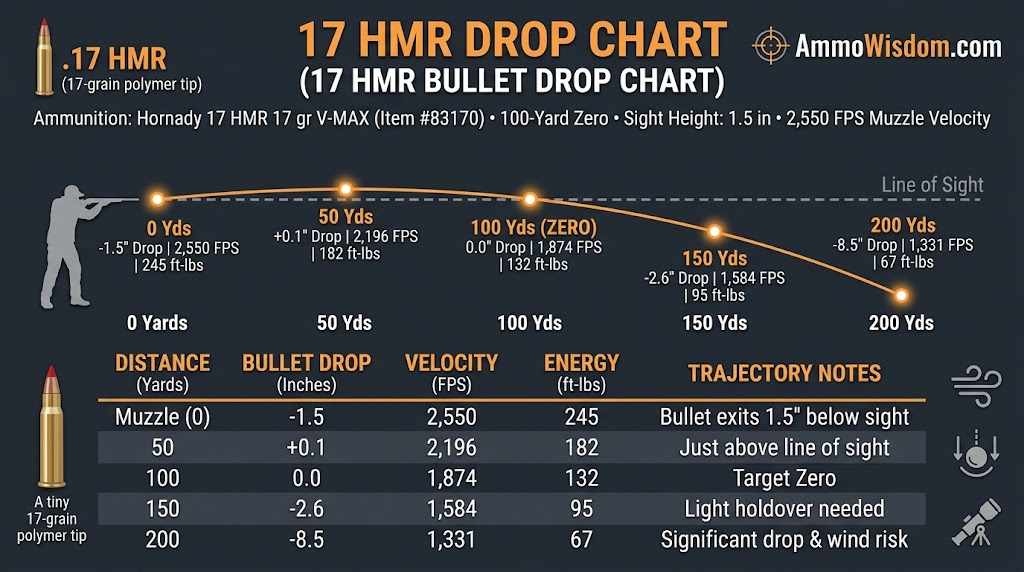
17 HMR Bullet Drop Chart by Distance
Understanding how the bullet behaves at specific intervals helps shooters make quick adjustments in the field. Based on the 17-grain V-MAX specifications above, here is how the trajectory changes at common shooting ranges.
50 yards
At 50 yards, a 17 HMR rifle zeroed for 100 yards is essentially dead-on, typically hitting just +0.1 inches high. Because the bullet is traveling at nearly 2,200 FPS, gravity has not yet had time to pull it down significantly. You can aim directly at your target without holding under.
100 yards
This is the standard zero distance for the .17 HMR. At 100 yards, the bullet intersects your line of sight perfectly (0.0 inches of drop). The bullet has shed some speed, crossing the 100-yard mark at roughly 1,874 FPS, but still carries over 130 foot-pounds of energy, which is highly effective for small game.
150 yards
The 150-yard mark is where you must begin compensating for gravity. The bullet drops approximately 2.6 inches below your crosshairs. Depending on your target size, you will need to apply a slight holdover (aiming a couple of inches high) to ensure a precise impact.
200 yards
At 200 yards, the lightweight 17-grain bullet drops steeply by approximately 8.5 inches. Velocity has dropped to around 1,331 FPS, making the bullet much more susceptible to wind deflection. Hitting small targets at this distance requires a thorough understanding of your reticle and accurate range estimation.
What Affects 17 HMR Bullet Drop?
No ballistic table is universal. Several physical and environmental factors will alter your real-world trajectory compared to a published chart.
- Muzzle velocity: Higher velocities result in a flatter trajectory. A 17-grain bullet traveling at 2,550 FPS will drop less over distance than a heavier 20-grain bullet leaving the muzzle at 2,375 FPS. Variations in barrel length will also change your actual muzzle velocity.
- Bullet weight and ballistic coefficient: The .17 HMR is most commonly available in 15.5-grain, 17-grain, and 20-grain weights. Heavier bullets typically have slightly better ballistic coefficients (allowing them to retain velocity better) but start with a slower muzzle velocity, resulting in a more arced trajectory.
- Zero distance: The distance at which you set your rifle scope to hit dead center dictates your entire trajectory curve. Changing the zero shifts the baseline for every other measurement on the chart.
- Sight height: The height of your optic above the bore axis changes the angle at which the bullet must rise to meet your crosshairs. Taller scope rings require the bullet to travel at a steeper upward angle, altering the drop numbers at close and long ranges.
- Wind and atmospheric conditions: Air density, which is affected by altitude, temperature, and humidity, dictates how much drag the bullet experiences. Thinner air (higher altitude) results in less bullet drop. Additionally, the tiny 17-caliber projectile is heavily influenced by crosswinds, making windage adjustments just as critical as elevation holds.
17 HMR Drop Chart at Different Zero Distances
Your chosen zero distance dictates the trajectory curve. While 100 yards is the industry standard for this cartridge, some shooters prefer a 50-yard zero for close-range pest control.
If you zero a 17-grain V-MAX at 50 yards (assuming a 1.5-inch sight height), your point of impact will shift. Because you have aligned the sight line and the bore line earlier in the bullet’s flight, it will not arc as high. As a result, at 100 yards, the bullet will strike approximately 0.2 to 0.4 inches low, rather than hitting dead-on. By 150 yards, your drop will increase to roughly -3.2 inches, compared to the -2.6 inches seen with a 100-yard zero. Always calculate your trajectory based on your specific zero distance to ensure accurate holdovers.
Frequently Asked Questions
1. What is a 17 HMR drop chart?
A 17 HMR drop chart is a ballistic table that displays how much a .17 Hornady Magnum Rimfire bullet drops (due to gravity) at various distances from the muzzle. It helps shooters know exactly how high to aim to hit a target at extended ranges.
2. Are 17 HMR Drop Chart and 17 HMR Bullet Drop Chart the same?
Yes, both terms refer to the exact same ballistic data. They are used interchangeably by shooters, ammunition manufacturers, and ballistic calculators to describe the trajectory of the .17 HMR projectile.
3. How much does a 17 HMR bullet drop at 100 yards?
If your rifle is zeroed at 100 yards, the bullet drop is 0.0 inches at that distance. If zeroed at 50 yards, a standard 17-grain bullet will drop approximately a fraction of an inch (around -0.2 to -0.4 inches) below the line of sight by the time it reaches 100 yards.
4. How much does a 17 HMR bullet drop at 150 yards?
When using a standard 17-grain V-MAX load with a 100-yard zero and a 1.5-inch scope height, the bullet will drop approximately 2.6 inches at 150 yards.
5. How much does a 17 HMR bullet drop at 200 yards?
With a standard 100-yard zero, a 17-grain .17 HMR bullet drops approximately 8.5 inches at 200 yards. Heavier 20-grain bullets will drop slightly more, usually around 10.4 inches at the same distance.
6. What zero distance is used for a 17 HMR drop chart?
The industry standard zero distance for a 17 HMR drop chart is 100 yards. This takes full advantage of the cartridge’s flat-shooting characteristics, keeping the bullet within a half-inch of the line of sight anywhere from the muzzle out to 100 yards.
7. Does bullet weight affect 17 HMR bullet drop?
Yes. A lighter 17-grain bullet launches at a higher velocity, resulting in less drop out to 200 yards. A heavier 20-grain bullet (like the XTP) leaves the muzzle slower and therefore drops more rapidly over the same distance, despite retaining energy slightly better.
8. How does muzzle velocity affect trajectory?
Higher muzzle velocity means the bullet reaches the target faster. Because the bullet is in the air for less time, gravity has less time to pull it downward, resulting in a flatter trajectory and less required holdover.
9. Can different 17 HMR ammunition loads produce different drop figures?
Yes. Different loads feature different bullet designs (polymer tips vs. hollow points), different bullet weights (15.5gr, 17gr, 20gr), and different powder charges. These variations alter both the ballistic coefficient and the muzzle velocity, which changes the drop figures.
10. Why might actual bullet drop differ from a published chart?
Published charts are based on specific test conditions and standard barrel lengths (often 24 inches). Your rifle’s barrel length, the actual height of your scope rings, local weather conditions, altitude, and manufacturing variances in ammunition will all cause slight deviations from published ballistic charts.