A 10 yard zero target does not give you a 10 yard zero. It gives you a 50/200 yard zero, set at 10 yards. You aim at the black dot on the target, and your shots should land on the gray dot 1.9 inches below it. That offset is the whole method.
The figures in this article come from the 5.56 loads the target was made for, M193 55 grain and M855 62 grain, plus a true 10 yard zero for a 9mm pistol load. At 10 yards the M193 bullet lands 2.0 inches low with a 50 yard zero. At 50 yards it is dead on, and at 200 yards it is 0.9 inches high.
Table of Contents [Click to minimize]
10 Yard Zero – 10 Yard 50 200 Zero Target: The 50/200 Path at 10, 50 and 200 Yards
This chart is the M193 55 grain load from a 16 inch AR-15 barrel, with the optic 2.6 inches over the bore, on a 50 yard zero. Negative numbers are inches below the point of aim, and positive numbers are inches above it. The hold column is the mirror of the point of impact: hold high where the bullet lands low, and hold low where it lands high.
| Distance (yd) | Point of Impact (in) | Hold (in) |
|---|---|---|
| 5 | -2.3 | 2.3 high |
| 7 | -2.2 | 2.2 high |
| 10 | -2 | 2 high |
| 15 | -1.7 | 1.7 high |
| 25 | -1.2 | 1.2 high |
| 50 | 0 | Center |
| 75 | 0.9 | 0.9 low |
| 100 | 1.6 | 1.6 low |
| 150 | 1.9 | 1.9 low |
| 200 | 0.9 | 0.9 low |
| 250 | -1.8 | 1.8 high |
| 300 | -6.3 | 6.3 high |
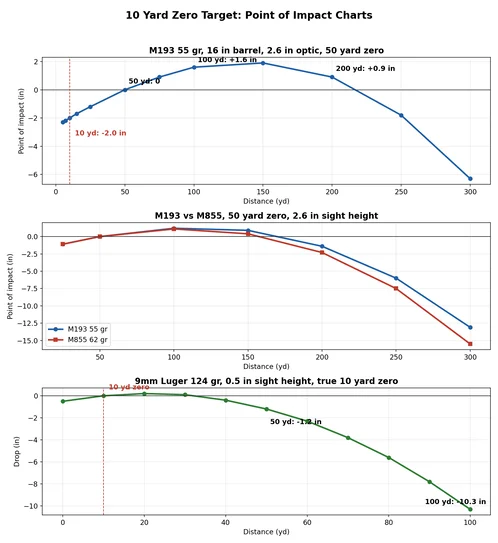
The curve shows why the target works. The bullet starts 2.6 inches below the sight line, climbs through it at 50 yards, rides about 1.9 inches high near 150 yards, and comes back through the line near 220 yards. At 200 yards it is still 0.9 inches high, so a center hold works from 10 yards out to 200.
How the 10 Yard Zero Target Works
The target is a plain sheet with two dots on it. The black dot at the top is your point of aim, and the gray dot 1.9 inches below it is where your shots should land. You hang the sheet at 10 yards, put your red dot on the black dot, and adjust the optic until your group sits on the gray dot.
That 1.9 inch gap is not a guess. It is the point of impact a 5.56 carbine shows at 10 yards when it is zeroed for 50 yards. Once the group is on the gray dot, the rifle is close to a 50/200 yard zero, and you refine it at longer distance.
The 1.9 Inch Offset
The target uses a 1.9 inch grid, and the two dots sit 1.9 inches apart, center to center. The black dot is the aim point, and the gray dot below it is the impact point for a 50 yard zero shot at 10 yards. The exact figure for that zero is 1.92 inches below the point of aim, and the target rounds it to 1.9 inches.
The table below gives the point of impact at 10 yards for the two zeros shooters ask about most.
| Zero | Point of Impact at 10 Yards |
|---|---|
| 50 yard zero | 1.9 in low |
| 100 yard zero | 2.06 in low |
Why 10 Yards Works for a 50 Yard Zero
At 10 yards the bullet is still climbing toward the line of sight, so the gap between the bore and the optic shows up almost in full. With a typical AR-15 optic height of about 2.6 inches over the bore, that gap puts the bullet about 2 inches low at 10 yards for a 50 yard zero. The short range only sets the angle; the zero itself is still 50 yards.
10 Yard Zero Chart: M193 vs M855 at 50, 100 and 200 Yards
This chart compares the two common 5.56 loads on the same 50 yard zero, with a 2.6 inch sight height. Both loads are dead on at 50 yards. The M193 load runs 1.2 inches high at 100 yards and 1.4 inches low at 200 yards, while the M855 load runs 1.1 inches high at 100 yards and 2.3 inches low at 200 yards.
| Distance (yd) | M193 55 gr Point of Impact (in) | M855 62 gr Point of Impact (in) |
|---|---|---|
| 25 | -1.1 | -1.1 |
| 50 | 0 | 0 |
| 100 | 1.2 | 1.1 |
| 150 | 0.9 | 0.4 |
| 200 | -1.4 | -2.3 |
| 250 | -6 | -7.5 |
| 300 | -13.1 | -15.5 |
The two loads track each other closely out to 150 yards, then the heavier M855 load falls away faster. At 300 yards the M193 load is 13.1 inches low and the M855 load is 15.5 inches low. Zero with the exact load you plan to shoot, because the two loads do not share a path past 200 yards.
A True 10 Yard Zero: 9mm Pistol Data
A true 10 yard zero is a different thing from the target method, and it belongs to pistols. This chart is a 9mm Luger 124 grain load at 1,090 fps, with the sight 0.5 inches over the bore, zeroed at 10 yards. It crosses the line of sight at 10 yards, peaks 0.2 inches high at 21 yards, crosses back down at 32 yards, and is 1.2 inches low at 50 yards and 10.3 inches low at 100 yards.
| Range (yd) | Drop (in) | Velocity (fps) | Energy (ft-lb) |
|---|---|---|---|
| 0 | -0.5 | 1090 | 327 |
| 10 | 0 | 1073 | 317 |
| 20 | 0.2 | 1057 | 307 |
| 30 | 0.1 | 1042 | 299 |
| 40 | -0.4 | 1027 | 291 |
| 50 | -1.2 | 1014 | 283 |
| 60 | -2.3 | 1001 | 276 |
| 70 | -3.8 | 989 | 270 |
| 80 | -5.6 | 978 | 263 |
| 90 | -7.8 | 967 | 257 |
| 100 | -10.3 | 956 | 252 |
The 10 yard zero keeps a 9mm pistol inside a 4 inch vital zone out to 57 yards with a dead center hold. Past that the bullet falls fast, which is why the 10 yard zero is a pistol zero and not a rifle zero. A 9mm carbine can use the same target, and shooters have used the 10-50-200 target on 9mm carbines with the same 1.9 inch offset at 10 yards.
10 Yard Zero vs 25 Yard Zero
The 10 yard zero and the 25 yard zero look similar on paper but do very different things at distance. The 25 yard zero is the Army zero, and it throws the bullet far above the line of sight in the middle of its arc. The 10 yard zero target method is a 50 yard zero in disguise, and it stays within about 2 inches of the aim point out to 200 yards.
What the 25 Yard Zero Does at 100 and 200 Yards
With a 25 yard zero, the M855 load from a 16 inch barrel is 5.7 inches high at 100 yards and 7.6 inches high at 200 yards. The M193 load is 6.1 inches high at 100 yards and 10.1 inches high at 200 yards. The M855 load peaks 7.9 inches high at 175 yards, and the M193 load peaks 10.2 inches high at 221 yards. That tall arc is why the 25 yard zero is a poor choice for a carbine you plan to shoot past 100 yards.
How to Use the 10 Yard 50 200 Zero Target
Print the target at actual size so the 1.9 inch spacing is true, and hang it at 10 yards, about 30 feet. Put your red dot or crosshair on the black dot, fire a three round group, and move the group onto the gray dot with the turrets. Then check the zero at 50 yards, where the group should sit on the aim point.
You can also use the target for bore sighting at home. Put the optic on the black dot and the bore sight laser on the gray dot, and the rifle will be close enough to get on paper at the range. A 1 inch grid target works the same way if you aim at a dot and move the group to a grid point 2 inches below it.
Clicks at 10 Yards
An optic with 1/4 MOA clicks moves the point of impact 1/4 inch per click at 100 yards, so it takes 10 clicks to move 1/4 inch at 10 yards. A group that looks close at 10 yards can be inches off at 50 yards, so measure the group from its center and count the clicks. Keep your head in the same place for every shot, because parallax is strong this close to the target.
Confirm at 50 and 200 Yards
The 10 yard target gets you close, and the check at distance makes it a real zero. Check at 50 yards first, where the group should be on the aim point. Then check at 100 yards, where the group will sit high, and at 200 yards if you can. Shooters who tested this method with iron sights, a red dot and a 1-4x optic all landed within 2 inches of the aim point at 50 yards.
What a 10 Yard Zero Means at 200 Yards
With the target method, 200 yards is the far zero, and the bullet is 0.9 inches high there with the M193 load. You hold center and hit center. With the M855 load the bullet is 2.3 inches low at 200 yards on the same zero, so the load matters at the far end of the path.
The 200 yard figures in this article belong to the 5.56 rifle loads, not to the 9mm load. The 9mm load is 10.3 inches low at 100 yards and has no 200 yard figure here, because a pistol zero does not stretch that far. Do not mix the two sets of numbers.
Does the Target Work for Other Calibers?
The target was made for 5.56, and it may work for other calibers, but it will need fine tuning at distance. The 1.9 inch offset depends on the optic height and the load, so a different caliber or a taller mount changes it. If you try it on another caliber, check the zero at 50 yards and again at 200 yards before trusting it.
Reference Loads Behind the Charts
These are the advertised muzzle figures for the loads in this article. The M193 load is also shown at 3,086 fps from a 16 inch barrel in the main chart, which is the barrel length figure behind the path data.
| Load | Bullet Weight (gr) | Muzzle Velocity (fps) | Muzzle Energy (ft-lb) | G1 BC |
|---|---|---|---|---|
| M193 55 gr FMJBT | 55 | 3270 | 1306 | 0.243 |
| M855 62 gr LAP | 62 | 2920 | 1174 | 0.304 |
| 9mm Luger 124 gr FMJ | 124 | 1090 | 327 | 0.169 |
Frequently Asked Questions
What is a 10 yard zero target?
It is a printable target that sets a 50/200 yard zero from 10 yards away. You aim at the black dot and adjust the optic until your shots land on the gray dot 1.9 inches below it.
Is a 10 yard zero the same as a 50/200 zero?
They are different. A 10 yard zero means the bullet crosses the line of sight at 10 yards, which is a pistol zero. The target method uses a 10 yard range to set a 50 yard zero, which crosses the line again near 200 yards.
Where should my bullets hit at 10 yards?
On the gray dot, 1.9 inches below your point of aim. The exact figure for a 50 yard zero is 1.92 inches low, and the target rounds it to 1.9 inches.
How far below the aim point is the gray dot?
1.9 inches, center to center. Print the target at actual size so the spacing is true, and measure it with a ruler before you shoot.
What is the point of impact at 50 yards?
Dead on. 50 yards is the near zero, so the bullet crosses the line of sight there. Both the M193 and M855 loads are on the aim point at 50 yards.
What is the point of impact at 200 yards?
The M193 load is 0.9 inches high at 200 yards, and the M855 load is 2.3 inches low. The far zero sits near 200 yards for the M193 load and near 177 yards for the M855 load on a 2.5 inch sight height.
Can I use the 10 yard 50 200 zero target for 9mm?
Yes, shooters have used it on 9mm carbines with the same 1.9 inch offset at 10 yards. For a pistol, a true 10 yard zero is the better choice, and this article charts one for a 124 grain 9mm load.
How does a 10 yard zero compare with a 25 yard zero?
A 25 yard zero throws the bullet 5.7 to 6.1 inches high at 100 yards and 7.6 to 10.1 inches high at 200 yards. The target method keeps the bullet within about 2 inches of the aim point out to 200 yards.
How many clicks move the group 1 inch at 10 yards?
With 1/4 MOA clicks, 40 clicks move the group 1 inch at 10 yards, because one click moves the point of impact 1/4 inch at 100 yards and only 1/40 inch at 10 yards. Measure from the center of the group before you count.
Do I need to confirm the zero at longer distance?
You do. The 10 yard target gets you close, and you should always check the zero at the real zero distance. Check at 50 yards first, then at 100 and 200 yards if you can.