You just bought a new rifle, mounted a new scope, and you are itching to get it sighted in. There is just one problem: you only have access to a 25-yard indoor range, or your local outdoor range maxes out at 50 yards. You know that a 100-yard zero is the gold standard for most centerfire rifles, but you simply don’t have the distance to do it.
Do you have to settle for a 25-yard zero? Absolutely not.
By understanding the relationship between your optic’s line of sight and the barrel’s bore axis, you can trick the physics of your rifle. You can shoot at a target that is only 25 yards away and walk out of the range with a mathematically sound 100-yard zero. Below is the quick-reference cheat sheet to get you started, followed by a breakdown of exactly how and why this method works.
The “25 for 100” Offset Cheat Sheet
To get a 100-yard zero at 25 yards, you do not want to hit the bullseye. You want your bullet to hit specifically low. The exact amount you need to hit low at 25 yards depends primarily on your optic height.
Note: These are mathematical approximations that will get you perfectly on paper and within an inch of a true 100-yard zero.
| Firearm Type | Optic Height (Over Bore) | Caliber | Point of Aim at 25 Yards | Point of Impact at 25 Yards |
| Traditional Hunting Rifle | Low/Med Rings (~1.5″) | .308, .30-06, 6.5 CM | Dead Center Bullseye | ~0.8 Inches LOW |
| AR-15 / Modern Sporting | Flattop Mount (~2.6″) | 5.56mm / .223 Rem | Dead Center Bullseye | ~1.5 Inches LOW |
| Tactical Precision Rifle | High Rings (~2.0″) | .308, 6.5 CM | Dead Center Bullseye | ~1.2 Inches LOW |
| PCC (Pistol Caliber) | Red Dot (~1.5″) | 9mm | Dead Center Bullseye | ~0.5 Inches LOW |
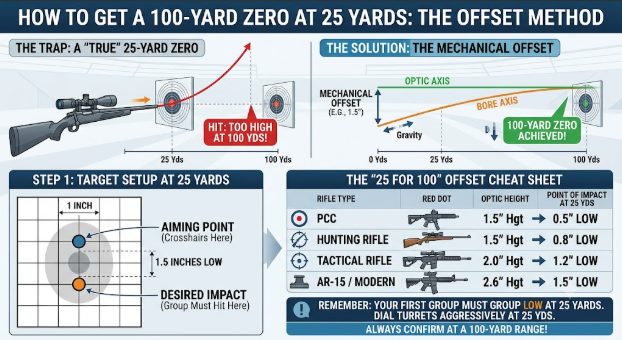
The Trap: Why a “True” 25-Yard Zero Ruins Your 100-Yard Shot
The biggest mistake new shooters make is walking into a 25-yard range, placing their crosshairs on the bullseye, and adjusting their turrets until the bullet hits dead center on that bullseye.
If you do this, you do not have a 100-yard zero. You have a 25-yard zero.
Because of the height of your optic over the barrel, your rifle is pointed slightly upward to make the bullet cross the crosshairs at 25 yards. The bullet is now on a steep upward trajectory. If you take that exact rifle out to 100 yards, your bullet is going to hit significantly high—sometimes as much as 4 to 6 inches over your target, depending on your caliber and optic height.
The Secret: Mechanical Offset
To understand the offset method, you have to look at the physical setup of your rifle:
- Line of Sight: Your scope looks in a perfectly straight, flat line forever.
- Bore Axis: Your barrel sits slightly below your scope.
When the bullet leaves the barrel, it starts below your crosshairs. To hit zero at 100 yards, the bullet must be on a very slow, gradual climb to meet your line of sight at exactly 100 yards.
Because 25 yards is only one-quarter of the way there, the bullet should only have climbed roughly one-quarter of the distance to the crosshairs. Therefore, to get a 100-yard zero at 25 yards, your point of impact must remain below your point of aim.
Step-by-Step: How to Zero Your Rifle
Ready to hit the range? Here is how to execute the offset zero flawlessly.
1. Set Up Your Target Strategically
Do not just use a blank piece of paper. Use a target with a 1-inch grid, or draw two distinct dots on a piece of cardboard.
- The Aiming Dot: Draw a dot near the top of the paper. This is where your crosshairs will rest.
- The Impact Dot: Measure straight down from your Aiming Dot using the specific offset from the chart above (e.g., exactly 1.5 inches down for an AR-15). Draw a second dot here. This is where you actually want your bullets to hit.
2. Lock Down Your Rifle
Shoot from the most stable position possible. Use a lead sled, a bipod with a rear bag, or heavy sandbags. At 25 yards, any shooter error is magnified four times when translated to 100 yards. A 0.25-inch flinch at 25 yards becomes a full 1-inch miss at 100.
3. Fire a 3-Round Group
Aim at your top Aiming Dot. Do not look at the bottom dot. Squeeze off three rounds slowly and steadily.
4. Adjust Your Turrets
Find the center of your 3-round group. You want to adjust your scope so that the next group moves toward the bottom Impact Dot.
- Pro Tip for 25 Yards: Scopes are adjusted in MOA (Minute of Angle) or MILs. At 100 yards, 1 MOA equals roughly 1 inch. But at 25 yards, 1 MOA equals just 0.25 inches.
- If your scope is 1/4 MOA per click, it takes 16 clicks to move the bullet 1 inch at 25 yards! Do not be afraid to aggressively dial those turrets.
5. Confirm the Offset
Fire another 3-round group aiming at the top dot. Your bullets should now be clustering perfectly over the bottom Impact Dot. If they are, congratulations—you have mathematically achieved a 100-yard zero.
Final Thoughts: The Golden Rule of Zeroing
Using a 25-yard range to get a 100-yard zero is an incredibly smart, time-saving, and ammo-saving technique. It ensures that the first time you actually step foot onto a 100-yard range, your very first shot will be securely on the paper.
However, remember the golden rule of ballistics: Math only gets you close; real-world physics confirms the hit.
Variations in ammunition lots, barrel harmonics, and slight errors in your optic height measurement mean this is a predictive zero. Always treat your 25-yard offset as a 95% solution. The next time you have access to a full 100-yard range, fire a confirmation group and make those final one-or-two click adjustments to make it perfect.