A rifle sling is more than a carrying strap. When properly looped and integrated with your body, it becomes a crucial stability aid that dramatically reduces wobble, manages recoil, and tightens your shot groups. Whether you are using a traditional leather military sling, a canvas web sling, or a modern tactical setup, mastering the loop technique transforms your shooting mechanics.
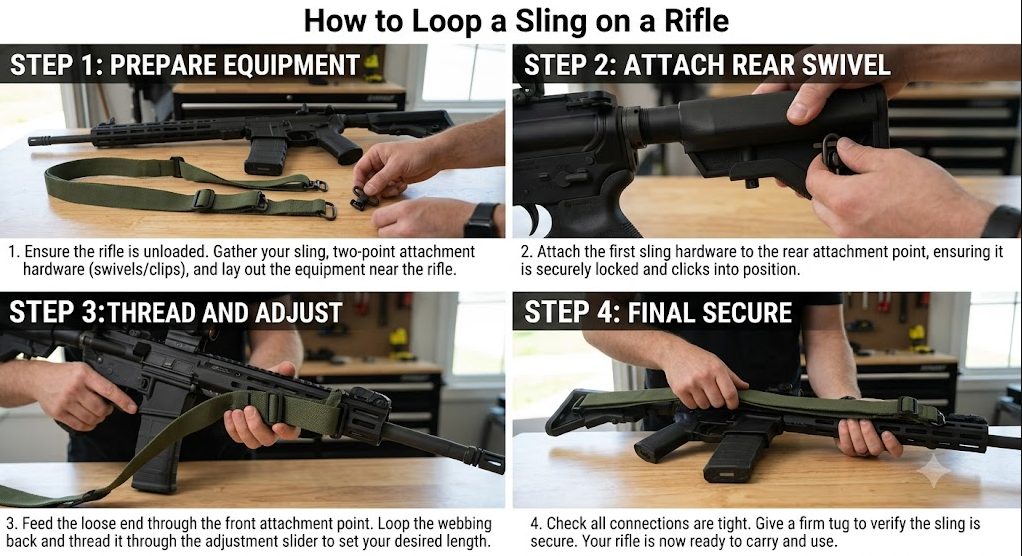
In this image you will find all steps to loop a sling on rifle
Understanding the Purpose of a Looped Sling
Most shooters view a sling solely as a tool for administrative transport. However, a looped sling anchors the rifle directly to your skeletal structure rather than relying entirely on muscle strength.
By creating a tensioned bridge between your support arm and the rifle forend, you transfer the weight of the firearm down through your bones and into the ground. This setup minimizes the natural micro-tremors of your muscles, stabilizes your sight picture, and ensures consistent return-to-battery under rapid fire or heavy recoil.
Step by Step Guide to Looping a Rifle Sling
This method covers the classic loop sling configuration, most commonly executed with a leather M1907 or a standard canvas Giles/web sling, which are the gold standards for precision marksmanship stabilization.
1. Identify and Prepare the Loop
Locate the upper keeper and the main loop adjustment hardware on your sling. If you are using a two-piece leather sling, unhook the frogs (the metal hooks) and adjust the strap to form a loop large enough to fit your arm easily. For canvas web slings, release the spring clamp and pull the webbing through to create a spacious loop.
2. Insert the Support Arm
Pass your non-firing support arm completely through the loop. You want the loop positioned high up on your tricep, well above the biceps muscle. Placing it too low near the elbow causes the sling to slip during tension and fails to lock into the skeletal frame.
3. Tighten and Secure the Loop
Pull the adjustment strap or slide the keepers down firmly against your arm. The loop must be tight enough to stay securely anchored high on your tricep without cutting off circulation. It should stay put even when your arm is completely relaxed.
4. Move the Arm Around the Sling
Bring your support hand out, over, and around the outside of the sling webbing. Then, bring your hand back inward to grip the forend of the rifle stock. This wrap technique ensures that the sling passes flat along the back of your hand and wrist, preventing the webbing from twisting or digging into your skin under tension.
5. Establish Skeletal Tension
Push the rifle forward into your shoulder pocket while driving your support elbow directly underneath the rifle receiver. The sling should now be taut. If the rifle feels loose or your arm muscles are straining to hold it up, shorten the sling length. If you cannot get the rifle to your shoulder, lengthen the sling slightly.
Key Tips for Maximum Stability
- Elbow Placement: Ensure your support elbow is positioned directly under the rifle rather than flared out to the side. Vertical alignment allows bone support to handle the weight.
- Hand Placement: Avoid gripping the forend with a white-knuckle squeeze. Let the forend rest naturally in the palm of your hand, using the sling tension to pull the rifle back into your shoulder.
- Pulse Dampening: If you feel your heartbeat pulsing through the reticle, the sling may be slightly too tight, or it is resting directly over a major artery. Readjust the position on your tricep slightly to mitigate this effect.